


Imagine not being able to eat your favorite meal, drink a glass of water, or even swallow without pain. For many patients recovering from surgery, dealing with neurological conditions, or facing digestive system challenges, this isn’t just a thought — it’s reality. In such moments, understanding ryles tube uses becomes essential, as this simple medical device can often be the difference between struggle and survival.
A Ryle’s tube (also known as a nasogastric tube) is a simple yet powerful tool that allows caregivers and medical professionals to provide essential care when normal eating isn’t possible. From delivering liquid nutrition and medications to draining harmful stomach contents, the Ryle’s tube uses are both varied and life-sustaining.
Whether you’re a caregiver at home, a family member trying to understand what your loved one needs, or someone exploring options for short-term recovery, this guide is for you. We’ll explore everything from the ryles tube uses to how it’s inserted, the parts involved, and the most important do’s and don’ts to keep patients safe and comfortable.
By the end of this post, you’ll gain clarity on how this seemingly simple tube plays a crucial role in patient care — and why understanding its purpose can make all the difference in your loved one’s recovery journey.
What is a Ryle’s Tube?
A. Definition and Purpose
A Ryle’s tube, also known as a nasogastric tube, is a soft, flexible tube that is gently inserted through the nose and passed down into the stomach. While it may sound a bit intimidating, this small medical device can be life-changing — even life-saving — for many patients.
So, what exactly does it do?
A Ryle’s tube is primarily used for three critical purposes:
- Feeding: When patients cannot eat or swallow on their own, liquid nutrition is delivered directly into the stomach via the tube.
- Medication Administration: Medicines in liquid or crushed form can be given through the tube when oral intake isn’t possible.
- Stomach Drainage: In cases of stomach bloating, vomiting, or digestive issues, the Ryle’s tube helps drain gastric contents, offering relief and preventing complications.
You’ll most often see this tube used in ICUs, during post-operative recovery, or for patients who have neurological issues, trauma, or severe digestive tract problems.
Its simplicity masks its power. The ryles tube uses go far beyond just feeding — it’s about restoring dignity, improving recovery, and preventing further medical issues in patients who need extra support.
B. Who Needs a Ryle’s Tube?
You might wonder — who exactly needs this kind of care? The answer is: more people than you think.
Here are a few examples:
- Post-Surgical Patients: After major surgeries, especially abdominal or gastrointestinal, the digestive tract may need rest. A Ryle’s tube ensures nutrition and drainage without burdening the system.
- Stroke Survivors: Swallowing difficulties (dysphagia) are common after a stroke. In such cases, the Ryle’s tube allows safe feeding while minimizing the risk of choking or aspiration.
- Patients with Digestive Issues: Individuals suffering from bowel obstructions, severe nausea, vomiting, or gastrointestinal bleeding may require a tube to relieve pressure and manage symptoms.
- Critically Ill or Comatose Patients: Those in the ICU or in a coma who cannot feed themselves often rely on this form of nutritional support.
The ryles tube uses are diverse, but the goal is always the same — to support healing, avoid complications, and make life easier for both patients and caregivers.
Ryle’s Tube Uses in Healthcare

When someone is unable to eat, digest, or even swallow, the Ryle’s tube becomes much more than just a medical device—it becomes a bridge to recovery. Whether it’s used temporarily or over an extended period, the Ryle’s tube uses in healthcare are vast, precise, and often life-sustaining.
Let’s break it down into the four major ways a Ryle’s tube supports patients in medical care.
A. Nutritional Support
One of the most common ryles tube uses is for providing nutritional support.
For patients who are too weak to eat, recovering from surgery, or experiencing issues like dysphagia (difficulty swallowing), this tube becomes their lifeline. It allows liquid nutrition—often specially formulated medical diets—to be delivered directly into the stomach, bypassing the mouth and esophagus entirely.
This ensures:
- Patients receive essential calories, proteins, and fluids
- No risk of choking or aspiration during feeding
- Continued strength and healing, even in a fragile state
This type of support is critical for stroke survivors, ICU patients, and even cancer patients during recovery.
B. Medication Administration
Another essential function of the Ryle’s tube is the delivery of medication.
When swallowing pills is difficult or impossible—due to neurological disorders, unconsciousness, or post-surgical recovery—the Ryle’s tube allows nurses or caregivers to administer liquid medications or crushed pills (mixed with water) directly into the stomach.
The benefits?
- Precise dosing
- Faster absorption in some cases
- No risk of missed doses due to swallowing issues
This is especially helpful in homecare settings, where professional nursing support ensures safe, hygienic, and effective use of the tube.
C. Stomach Decompression
In emergency cases—like intestinal obstruction, excessive vomiting, or bloating due to gas build-up—a Ryle’s tube plays a different but equally important role: decompression.
Here, the tube is used to drain out stomach contents such as:
- Bile
- Fluids
- Air or gas
- Toxins
This process reduces internal pressure, relieves pain, and prevents complications like aspiration pneumonia. It’s a common intervention in ICUs and emergency departments.
This is one of the more urgent ryles tube uses and highlights just how versatile the tool really is.
D. Diagnostic Uses
Aside from feeding and relief, the Ryle’s tube also has several diagnostic purposes. Doctors may use the tube to:
- Check for gastrointestinal bleeding (e.g., in ulcers or varices)
- Collect stomach fluid samples for lab testing
- Assess stomach acid levels or contents before surgery
While it might not be the first thing that comes to mind, this function plays a critical role in determining the root cause of digestive symptoms and planning appropriate treatment.
Parts of a Ryle’s Tube: Understanding the Components
While the ryles tube uses are wide-ranging—feeding, medication, decompression, and diagnosis—it’s equally important to understand the parts that make up this life-sustaining device. Every element of a Ryle’s tube is designed with precision and patient safety in mind.
Let’s explore the essential components that make this simple-looking tube such a powerful medical tool.
A. Key Components
A Ryle’s tube may appear straightforward, but it includes several carefully engineered features that serve critical functions:
- Markings for Depth and Placement: These black or colored graduation marks along the tube help healthcare providers measure the correct insertion depth. Proper placement is crucial to ensure the tube reaches the stomach and not the lungs.
- Side Holes for Drainage or Feeding: Strategically placed lateral holes near the tip of the tube allow for smooth delivery of feed or medications and easy drainage of gastric contents.
- Radiopaque Line for X-ray Visibility: Most Ryle’s tubes have a radiopaque strip embedded in the tubing, making it visible on an X-ray. This allows medical professionals to confirm correct placement before use—minimizing risks like aspiration or misplacement.
- Connector for Feeding or Suction Tubes: The external end of the Ryle’s tube includes a universal connector, allowing it to attach to syringes, feeding pumps, or suction devices. This adaptability enhances the variety of ryles tube uses in both hospital and homecare settings.
Each of these parts works together to ensure safety, efficiency, and comfort—especially for vulnerable patients.
B. Material and Sizes
To reduce discomfort and increase biocompatibility, Ryle’s tubes are made from soft, body-friendly materials:
- Material: Most modern tubes are made of polyurethane or medical-grade silicone. These materials are flexible, non-toxic, and designed to sit comfortably in the nasal passage for extended periods.
- Sizes: Ryle’s tubes come in various sizes, commonly measured in French units (Fr).
- Pediatric patients: Smaller sizes (6–10 Fr)
- Adults: Commonly 12–16 Fr, depending on the patient’s needs
Choosing the right size is vital for minimizing irritation and ensuring effective function. This choice is often guided by the purpose—whether the tube is being used for nutrition, medication, or decompression.
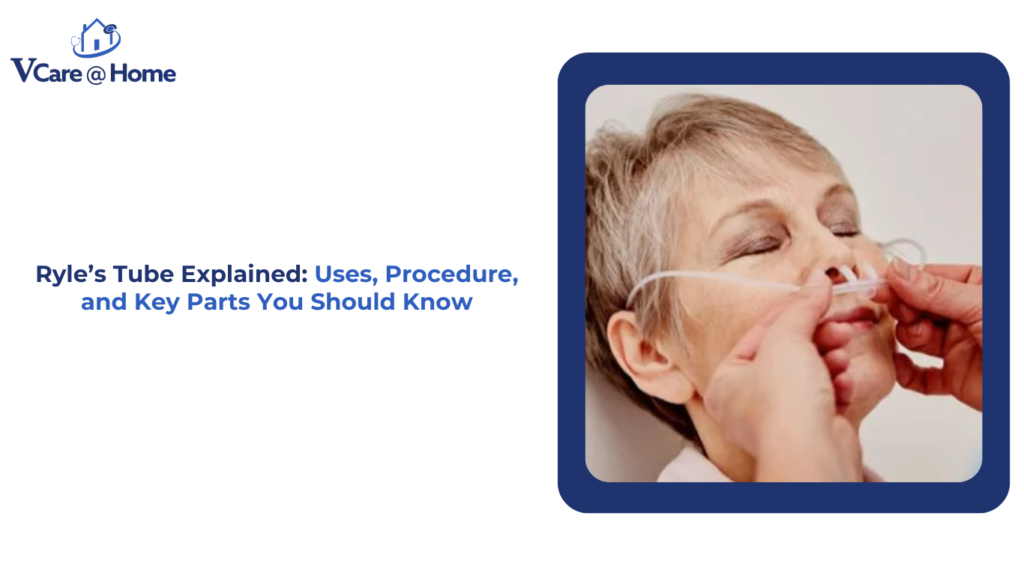
How is a Ryle’s Tube Inserted? (Step-by-Step)
For many patients, especially those unable to eat or swallow, the ryles tube uses start with a critical first step—safe and accurate insertion. Though it may seem daunting at first glance, this procedure, when done correctly, is quick, efficient, and life-enhancing.
Let’s walk through the process step-by-step, from preparation to post-insertion care, so you know exactly what to expect.
A. Pre-Insertion Preparation
Proper preparation makes all the difference—for both patient comfort and procedural safety.
- Explaining the Procedure
Before anything begins, the healthcare provider calmly explains the process to the patient. This helps reduce anxiety and gain cooperation—especially important if the patient is conscious and alert. - Gathering Supplies
The nurse or caregiver prepares the necessary items:
- Disposable gloves
- Water-soluble lubricant
- A clean Ryle’s tube
- A glass of water with a straw (if the patient can swallow)
- pH testing strips
- Adhesive tape or fixation device
Creating a calm and clean environment is the first step in ensuring a smooth procedure.
B. Insertion Procedure
Now comes the part where precision, care, and training are key.
- Measuring the Correct Length
The caregiver measures the appropriate length of the Ryle’s tube by holding it from the tip of the nose to the earlobe, then down to the xiphoid process (bottom of the sternum). This ensures the tube reaches the stomach without going too far. - Lubricating and Gently Inserting the Tube
After applying lubricant, the tube is gently inserted through one nostril and guided backward and downward into the throat. If the patient is conscious and able to swallow, they may be asked to sip water during the insertion to help guide the tube down the esophagus. - Verifying Placement
Before using the tube, placement must be confirmed to avoid serious complications:
- pH test: Gastric contents are aspirated, and the pH is checked (should be acidic).
- Auscultation: A small amount of air is pushed through the tube while listening to the stomach area with a stethoscope.
- X-ray confirmation: Often used in hospitals for the most accurate verification.
Proper placement is essential for all ryles tube uses, from nutrition to decompression.
C. Post-Insertion Care
Once the tube is successfully inserted, careful monitoring is vital:
- Securing the Tube
The tube is fixed to the nose or cheek using medical tape or a specialized securing device to prevent accidental removal or displacement. - Monitoring for Discomfort or Complications
Healthcare providers regularly check for:
- Irritation or pressure ulcers at the nostril
- Leaks or blockages
- Signs of displacement, such as coughing, gagging, or vomiting
Patients often need time to adjust to the tube, but with skilled care, discomfort is minimized.
Common Mistakes to Avoid

While Ryle’s tube uses are life-saving and essential in many care situations, improper handling can lead to complications. Whether you’re a trained healthcare provider or a caregiver at home, avoiding common mistakes can make a significant difference in a patient’s safety and comfort.
Let’s look at some critical errors to steer clear of — and how to prevent them.
For Caregivers and Professionals
1. Inserting Without Proper Lubrication
It might seem like a small step, but failing to apply water-based lubricant before insertion can cause nasal irritation, discomfort, and even injury. The nasal passage and throat are sensitive areas — without lubrication, the tube may drag against tissues, making the procedure unnecessarily painful.
Always ensure the tip and a portion of the Ryle’s tube are generously lubricated before insertion.
2. Forgetting to Verify Placement
One of the most dangerous mistakes is assuming the tube is correctly positioned without checking. A misplaced tube can enter the lungs, leading to severe complications like aspiration pneumonia.
Remember: All ryles tube uses — whether feeding, medication, or decompression — depend on correct placement. Always use a pH test, auscultation, or X-ray to confirm before use.
3. Forceful Insertion Causing Trauma
If you meet resistance while inserting the tube, stop. Forcing it can cause:
- Bleeding from the nasal cavity
- Damage to the esophagus or throat
- Emotional trauma to the patient
Insertion should always be gentle, slow, and guided, ideally with the patient swallowing water if they’re conscious. If difficulty continues, seek assistance instead of pushing through.
4. Not Monitoring for Dislodgement or Blockage
Once the Ryle’s tube is in place, it doesn’t mean the job is done. Tubes can shift, block, or kink. A dislodged tube won’t function correctly and could put the patient at risk.
Watch for signs like:
- Coughing or choking
- Change in aspirated content
- Unexpected discomfort
- Poor flow during feeding
All ryles tube uses rely on clear pathways and correct placement, so regular checks and maintenance are essential for ongoing safety.
💡 Pro Tip:
Document insertion times, verification methods, and any signs of complications in a care log. This promotes continuity of care, especially in a home nursing or ICU setting.
Safety Tips and Best Practices
Using a Ryle’s tube may seem routine in medical settings, but for patients and caregivers—especially in home care—safety and hygiene are non-negotiable. The benefits of Ryle’s tube uses can quickly turn into complications if best practices aren’t followed consistently.
Let’s walk through simple yet crucial tips that can make all the difference in the patient’s safety, comfort, and overall recovery.
1. Always Check Tube Placement Before Feeding
No matter how many times feeding has been done, never assume the tube is still in place. Movement, coughing, or even turning in bed can cause the Ryle’s tube to dislodge.
Why it matters:
If misplaced, feeding into the lungs can lead to aspiration pneumonia, a potentially life-threatening condition.
Quick Tip:
- Verify placement using pH testing or auscultation before each feeding session.
- Look for signs of displacement like coughing, breathlessness, or unusual pain.
This is one of the most critical safety checks in all ryles tube uses.
2. Keep the Head Elevated During and After Feedings
Patients must be in a semi-upright position (30–45° angle) during feeding and remain that way for at least 30 minutes after.
Why it matters:
- Prevents reflux and aspiration
- Aids in digestion
- Reduces the risk of discomfort and vomiting
This practice is especially vital for elderly patients, those with reflux issues, or those on long-term tube feeding.
3. Clean the Tube’s Outer Surface Daily
The portion of the Ryle’s tube outside the body can easily collect dirt, sweat, and bacteria. If neglected, this can lead to infections around the nostrils or skin irritation.
Best Practice:
- Gently clean with a soft cloth, mild soap, and warm water daily.
- Check the nose for signs of redness, soreness, or ulceration.
This small act of daily care helps ensure hygienic and effective ryles tube uses.
4. Flush or Replace the Tube as Per Guidelines
Over time, food particles or medications can block the tube. Regular flushing with sterile water helps maintain patency and prevent blockages.
General Guidelines:
- Flush before and after every feeding or medication
- Use only recommended solutions
- Follow your healthcare provider’s replacement schedule
In long-term ryles tube uses, a neglected tube can become hardened, blocked, or even pose a risk of infection.
Conclusion
A Ryle’s tube is more than just a medical tool—it’s a lifeline for patients who cannot eat or take medications orally. From delivering nutrition and medications to decompressing the stomach and aiding in diagnosis, Ryle’s tube uses are vital in critical care. Understanding how it works empowers caregivers and families to ensure safer, more compassionate support at home. In a world where every little step in patient care matters, being informed about something as simple as a Ryle’s tube can lead to better comfort, faster recovery, and fewer complications. If you’re looking for expert help with Ryle’s tube insertion, feeding, or short-term nursing care at home, VCare@Home is here for you. Our experienced home healthcare team ensures your loved ones receive the care they deserve—right where they feel most safe and supported.
FAQs about Ryle’s Tube Uses
Q1: How long can a Ryle’s tube stay in place?
A: Typically 7–14 days, but it varies based on the patient’s condition and doctor’s advice.
Q2: Can a Ryle’s tube be used for long-term feeding?
A: No, for long-term feeding, a PEG (percutaneous endoscopic gastrostomy) tube is more suitable.
Q3: What are the side effects of Ryle’s tube insertion?
A: Possible irritation, gagging, nasal discomfort, or in rare cases, aspiration if mispositioned.
Q4: How do I know if the tube is in the correct position?
A: pH testing of aspirate, air insufflation with auscultation, or confirmation via X-ray.
Q5: Can a caregiver insert or manage a Ryle’s tube at home?
A: Only a trained nurse or medical professional should insert it. Daily care can be guided by professionals like those at VCare@Home.
Q6: What food can be given through a Ryle’s tube?
A: Prescribed liquid or semi-liquid food supplements, or blended food with proper consistency.


